• Going Green with Your Wort Chilling Process

    A lot of home brewers will run their garden hose into the wort chiller and let the excess water runoff into their yard. This is a colossal waste of water. To help avoid wasting so much water, my brother (Mathew) and I use ice to speed the process of chilling the wort. This has the benefit of streamlining the process and not wasting so much water.

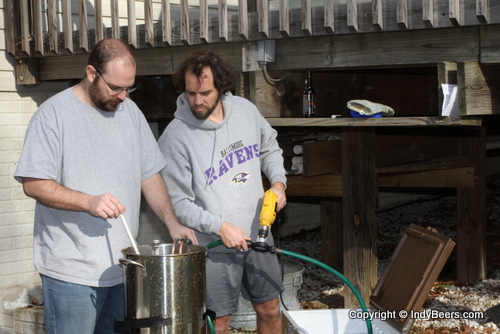
    For me, I use a propane burner that has a tendency to make a mess of soot on the bottom of my pot. To keep this mess out of my house I circulate the water from my wort chiller through a cooler filled with water and ice.

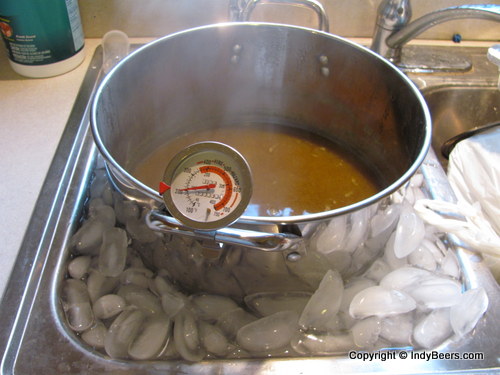
    Mathew, using the stove in his kitchen to brew beer, doesn’t have the soot problems. He just soaks his brew pot in an ice bath in his sink to chill his wort.


    I have two refrigerators, one that makes ice, and one that doesn’t. This is the ice I use for my wort chiller.


    This freezer isn’t hooked up to water, so I bring ice from the other freezer to this one for storage.


    On brew day, I put all the ice from the second refrigerator into a cooler and then add water.


    The pump for using with the wort chiller when brewing beer to recirculate the water.


    It works really well and can be purchased from your local hardware store.


    The time is 3:51:29 pm when I was ready to start.


    Doing this by yourself is kind of a pain, but it only takes 10-15 minutes. I should get clamps to hold the hoses in place and zip-tie the drill into an on position.


    Kelli came out and took a picture of me doing the process.


    The time is now 4:06:08 pm, a delta of about 15 minutes.


    This is how much ice was left after the process. I started with about 12-16lbs of ice.


    I use a cooler method of recirculating the water because the soot makes an awful mess if I try and do an ice bath like Mathew.


    Mathew has his spare refrigerator hooked up to water, and this is how he collects all the ice needed. The freezer holds about 25lbs of ice. (a full freezer has been shown to use less energy)


    His sink is 7 inches deep.


    And about 16 inches wide.


    He puts his pot in the sink first.


    Then he adds about 12-15lbs of ice and some water to make the ice float. To speed up the process he stirs both the wort and the ice every minute or so to keep the heat exchange happening at a fastest rate. The time is 5:47:05 pm.


    In his process this is how much ice he was left with after doing the ice bath.


    The time is now 6:00:47 pm, a delta of about 15 minutes. He goes to 85deg because when he adds the additional 2.5gal his tap is 60-65 deg; Therefore, he ends at between 70-75 deg to pitch the yeast. His method is much easier as you don’t have to hold a drill the whole time.

  • Home Brewing – The first batch

    Mathew and I brewed the first batch of beer together, and it was a lot of fun. Here are the pictures.

    Having never brewed beer before, I took the easy method of buying a kit.


    This was most of what was in the kit, after I washed and sanitized everything.


    I now have a water filter at the house, but the first few times I brewed I bought filtered water.


    We were using a Brewers Best recipe, the red ale.


    Looks red to me.


    After the 20 minute steep, we pulled out the grains.


    After coming up to boil we added the liquid malt extract (LME)...


    And the bittering hops...


    Check out that action shot!!


    Well, it was our first time and we left the lid on the pot. Too much heat resulted in a small boil over.


    With 5 minutes to go we added the aroma hops.


    My father had stopped by and gave my brother and me a hand adding the hops in.


    He also helped by taking this picture of Mathew and me cooling the wort with the wort chiller.


    We were able to go from boiling to 75 degrees in about 10 minutes.


    We recycled the water from a cooler filled with ice water.


    This did not work well and the newer setup is using a 10" stainless steel strainer and just dumping the pot into the bucket.


    Well, that is it for brewing, now it's time for other things.


    After a week, we needed to move from primary to secondary fermentation.


    Looks like we lost about a half gallon to evaporation.


    I no longer use the siphon and instead just put one bucket above the other and let gravity do the work.


    We, of course, had to taste the beer at this point in the process.


    It was flat and wasn't cold, but we both said, "It doesn't suck!"


    Much easier this way.


    I did a lot of reading, and everyone said bottling is a pain in the butt, so I bought a kegging setup.


    After two weeks we moved the beer to the keg.


    I needed to mount the taps on the fridge, which was really easy.


    And with the whole thing done, we were ready to drink beer!!!


    As of this writing, I'm now on batch six, and LOVING making my own beer.


    I no longer use the kits and have started experimenting with various styles.


    But I like having two beers on tap!!!!


  • WilliamsWarn – The World’s First Personal Brewery

    Relatives of a friend of Chris’ came up with this great idea, a completely self contained brewing unit.  All you have to do is add the ingredients and then wait for the beer to be ready on tap.  Coming in at about $4500 US (they are based out of New Zealand) The WilliamsWarn isn’t for everyone, but if you have the cash, and want an easy method to home brew your own beer, this is for you.  I would love to get my hands on one and try it out.

    Here is some information from their website describing how it works.

    The WilliamsWarn Personal Brewery has six main technical features that, when combined together, create the world’s first all-in-one brewing appliance. This combination then allows you to make the freshest beer on the planet with minimum effort. The current design is for 23 litres of beer.


    1. A stainless steel pressure vessel with beer carbonation level control
    The current global homebrewing method of making beer involves making flat beer that then needs to be carbonated somehow in a secondary production step. This extra step can take up to 4 weeks in the case of bottled homebrew. We have solved this problem by fermenting the beer in a stainless steel pressure vessel that allows the beer to carbonate during the first day of fermentation and hold its carbonation level after that. So there’s no need to bottle or keg the beer and an enormous amount of work and weeks of waiting time is eliminated. It pours out of the brewery, fully carbonated, 7 days after you’ve added the ingredients.


    2. A temperature control system
    Poor temperature control in homebrewing is responsible for both long fermentation periods and poor beer flavour. It is also the reason why homebrew can give you a big headache. The WilliamsWarn Personal Brewery has perfect temperature control throughout the entire process, just like a modern brewery. By the turn of a dial on the control panel, temperature is controlled during fermentation, maturation, clarification and beer dispense. So there are no delays in the beer production and the flavour is commercial quality.


    3. A sediment removal system
    Transferring beer from one tank to another oxidises the beer. The No.1 beer brand in the world has a 3 1/2 month shelf-life because of this. They believe you can taste it. Breweries and good homebrewers minimise this transferring as much as possible but they can’t avoid it and the beer gets moved from tank to tank and into packaging and oxidised along the way. We on the other hand have developed a system that involves no transfers at all. We achieve this by having a bottle under the tank cone that allows us to collect all yeast and haze sediment during fermentation and after clarification, which then gets removed off the tank without the beer having to be moved. Therefore the clear beer coming out of the WilliamsWarn Personal Brewery has never been tranferred and is technically the freshest beer in the world.


    4. A clarification system
    After fermentation the beer is cold and carbonated but it’s still hazy and needs some extra clarification. But because we’ve developed a pressurised fermentation system that self-carbonates (so that we could eliminate the weeks long secondary carbonation step homebrewers have to do) we’ve needed to develop a beer clarification system that works under pressure. So the WilliamsWarn has a well-designed system that allows 50ml of a special clarification agent to be forced into the beer and mixed well for about 10 seconds, whilst the whole tank is still under pressure. The remaining yeast cells and beer haze then all fall into the sediment bottle under the tank, which then gets removed. This helps clear the beer without us having to move the beer, which has resulted in us being able to invent the first all-in-one brewing machine. Everything occurs in one tank instead of many tanks, kegs and bottles.


    5. A gas dispense system
    Once the beer is cold and clarified, it is ready to consume. However if we opened the beer tap and started pouring beer, as we emptied the tank over time, the tank pressure would start to decrease and the beer would become flat. This is because as the headspace becomes larger and the beer volume smaller, the CO2 in the beer moves into the headspace and the beer starts to lose its fizz. So what we need to do is maintain the pressure in the headspace as the level decreases, with an external source of CO2. Then the natural CO2 in the beer stays in the beer and it remains fully carbonated right until the last drop. So we use Soda Stream CO2 cylinder that is placed in the machine, to help push the beer out the beer tap and maintain the same pressure in the tank from first drop till last drop.


    6. A draft beer dispense mechanism with flow-control
    The final important part of the technology is the beer tap. Because the beer is under pressure and the tap is close to the tank, we need to be able to restrict the flow so that the beer doesn’t flow out of the tap too quickly and cause over-foaming in the glass. In addition, because we can make unlimited beer styles in the personal brewery, the beer in the tank can be a highly carbonated wheat beer or a low carbonated English ale, so be sitting at different tank pressures. We have therefore used a beer tap with a flow-control mechanism to account for these two issues. This enables the brewer to control the speed of the pour, so that he or she can always get the perfect pour into the glass. The mechanism is simply a small lever on the side of the tap that can be easily adjusted before or during a pour, to restrict or open-up the flow inside the tap as it is dispensed. In addition, by pulling the top of the tap backwards, you can add more foam to the top of your beer in your glass.


    Source: http://www.williamswarn.com/

  • Beerporn

    image